In the Create a new project window, select C# from the Language list. Next, select Windows from the platform list, and Web from the project types list. After you apply the language, platform, and project type filters, select the ASP.NET Core Web App template, and then select Next.

Creating ASP.NET Core Application using MVC Template
In this Video, I am going to discuss how to create an ASP.NET Core application using MVC Project Template (Web Application (Model-View-Controller)). Please read our previous Video before proceeding to this Video where we discussed application.
Creating an ASP.NET Core MVC Application:
As of now, we have discussed everything using the Empty Project Template and understand the different parts of an ASP.NET Core Application. We also discussed how to set up the MVC Request pipeline in ASP.NET Core Web Application.
But the question is do we really need to set up everything manually to create an ASP.NET Core MVC Application? The answer is NO. The ASP.NET Core provides one built-in project template called MVC which will create an ASP.NET MVC Core MVC Application for us with the required setup. From this Video onwards, in this ASP.NET Core MVC course, we are going to create the applications using the MVC Project template. Let us see the step by step procedure to create the same.
Creating an ASP.NET Core Application using MVC Project template:
To create an ASP.NET Core Web Application with MVC Project template. First of all, open Visual Studio 2019 and then click on the Create a new project tab as shown in the below image.

Once you click on the Create a new project tab, it will open the following Create a new project window. From this window, you need to select the ASP.NET Core Web Application template and then click on the Next button as shown in the below image.

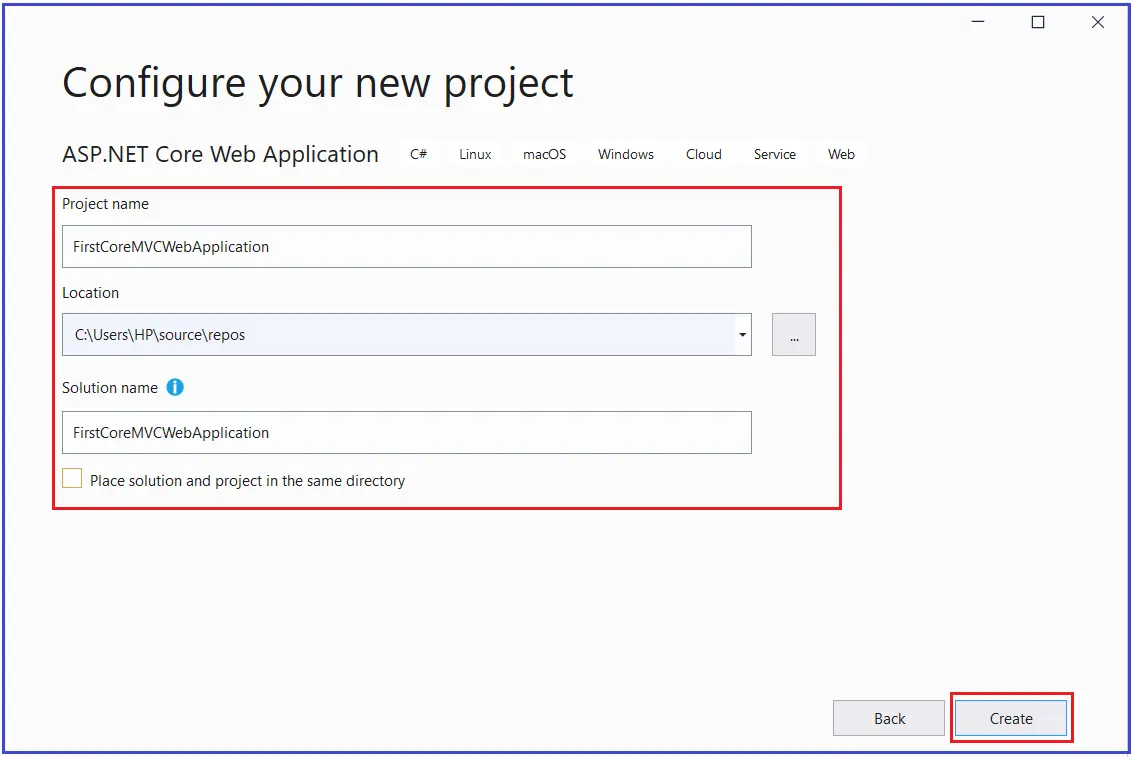
Once you click on the Next button, it will open the Configure Your New Project window. Here, you need to provide the necessary information to create a new ASP.NET Core project. First, give an appropriate name for your project (FirstCoreMVCWebApplication), set the location where you want to create this project, the solution name for the ASP.NET Core Web application. And finally, click on the Create button as shown in the image below.

Once you click on the create button, it will open the following Create a new ASP.NET Core Web Application window where you need to select the project template i.e. which type of project you want to create. As we are going to create an MVC Application, so, select the Web Application (Model-View-Controller) Project template and uncheck all the checkboxes from the Advanced section and finally click on the Create button as shown in the below image. Make sure to select the .NET Core and ASP.NET Core 3.1 from their respectively drop-down list.

Thats it. Once you click on the Create Button, the project is going to be created with the Web Application (Model-View-Controller) i.e. MVC template with the following folder and file structure.

The MVC Project template by default includes the required setup for MVC. To confirm this, open the Startup.cs class file and you will see the required MVC Services and MVC Request processing pipeline are added by the framework as shown in the below image.

Running the Application:
The MVC Project template creates the Home Controller with some views. Let us run the application and see the output as shown below.

 Best resource for Online free Education