Loading

React Native

How to Add Icons at the Bottom of Tab Navigation in React Native ?. The Complete React Native Developer Course 2023 [Videos].

Adding Icons at the Bottom of Tab Navigation in React Native is a fairly easy task. In this article, we will implement a basic application to learn to use icons in our tab navigation. For this, we first need to set up the application and install some packages.
Implementation: Now lets start with the implementation:

  • Step 1: Open your terminal and install expo-cli by the following command.

    npm install -g expo-cli
  • Step 2: Now create a project by the following command.

    expo init tab-navigation-icons


  • Step 3: Now go into your project folder i.e. tab-navigation-icons

    cd tab-navigation-icons

Step 4: Install the required packages using the following command:

npm install --save react-navigation react-native-gesture-handler 
npm install --save react-native-vector-icons  

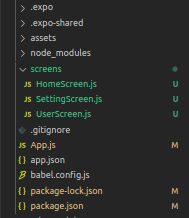
Project Structure: It will look like the following.
Example: Now, lets set up the Tab Navigator and add icons, along with some basic CSS styles to make the icons look presentable. There will be 3 screens in our demo application, namely- Home Screen, User Screen, and Settings Screen. Thus, we will have 3 tabs to navigate between these 3 screens, with our Home Screen being the default Screen.

import React from "react";
import { Ionicons } from "@expo/vector-icons";
import { createAppContainer } from "react-navigation";
import { createBottomTabNavigator } from "react-navigation-tabs";
  
import HomeScreen from "./screens/HomeScreen";
import UserScreen from "./screens/UserScreen";
import SettingScreen from "./screens/SettingScreen";
  
const TabNavigator = createBottomTabNavigator({
  Home: {
    screen: HomeScreen,
    navigationOptions: {
      tabBarLabel: "Home",
      tabBarOptions: {
        activeTintColor: "#006600",
      },
      tabBarIcon: (tabInfo) => {
        return (
          <Ionicons
            name="md-home"
            size={24}
            color={tabInfo.focused ? "#006600" : "#8e8e93"}
          />
        );
      },
    },
  },
  User: {
    screen: UserScreen,
    navigationOptions: {
      tabBarLabel: "User",
      tabBarOptions: {
        activeTintColor: "#006600",
      },
      tabBarIcon: (tabInfo) => {
        return (
          <Ionicons
            name="md-person-circle-outline"
            size={24}
            color={tabInfo.focused ? "#006600" : "#8e8e93"}
          />
        );
      },
    },
  },
  Setting: {
    screen: SettingScreen,
    navigationOptions: {
      tabBarLabel: "Setting",
      tabBarOptions: {
        activeTintColor: "#006600",
      },
      tabBarIcon: (tabInfo) => {
        return (
          <Ionicons
            name="md-settings-outline"
            size={24}
            color={tabInfo.focused ? "#006600" : "#8e8e93"}
          />
        );
      },
    },
  },
});
  
const Navigator = createAppContainer(TabNavigator);
  
export default function App() {
  return (
    <Navigator>
      <HomeScreen />
    </Navigator>
  );
}

The above code contains the logic for our Tab Navigator with icons at the Bottom of Tab Navigation. Now, we need the screens we need to navigate to.

import React from "react";
import { Text, View } from "react-native";
import { Ionicons } from "@expo/vector-icons";
  
const Home = () => {
  return (
    <View style={{ flex: 1, alignItems: "center", justifyContent: "center" }}>
      <Text style={{ color: "#006600", fontSize: 40 }}>Home Screen!</Text>
      <Ionicons name="md-home" size={80} color="#006600" />
    </View>
  );
};
  
export default Home;

import React from "react";
import { Text, View } from "react-native";
import { Ionicons } from "@expo/vector-icons";
  
const User = () => {
  return (
    <View style={{ flex: 1, alignItems: "center", justifyContent: "center" }}>
      <Text style={{ color: "#006600", fontSize: 40 }}>User Screen!</Text>
      <Ionicons name="md-person-circle-outline" size={80} color="#006600" />
    </View>
  );
};
  
export default User;

import React from "react";
import { Text, View } from "react-native";
import { Ionicons } from "@expo/vector-icons";
  
const Settings = () => {
  return (
    <View style={{ flex: 1, alignItems: "center", justifyContent: "center" }}>
      <Text style={{ color: "#006600", fontSize: 40 }}>Settings Screen!</Text>
      <Ionicons name="md-settings-outline" size={80} color="#006600" />
    </View>
  );
};
  
export default Settings;

Start the server by using the following command.

npm run android

Output: If your emulator did not open automatically then you need to do it manually. First, go to your android studio and run the emulator. Now start the server again.

Reference: https://reactnavigation.org/docs/tab-based-navigation/

See All

Comments (161 Comments)

Submit Your Comment

See All Posts

Related Posts

React Native / Youtube

Setting up the development environment of React Native.

If you are new to mobile development, the easiest way to get started is with Expo CLI. Expo is a set of tools built around React Native
8-Sep-2021 /1 /161

React Native / Blog

How React Native is different from ReactJS ?

ReactJS: It is a JavaScript library that supports both front-end and server-side. It is a popularly used library, which focuses on developing user interfaces (UI) for mobile as well as web-based applications. Developed by Facebook, it is based on the JavaScript language and hence, it is synonymously also called ReactJS.
19-jan-2022 /1 /161

React Native / Blog

How to Use Routing with React Navigation in React Native ?

Almost every mobile application requires navigating between different screens. React Native provides an elegant and easy-to-use library to add navigation to native applications: react-navigation. It is one of the most popular libraries used for routing and navigating in a React Native application.
19-jan-2022 /1 /161