Loading

React Native

What are different ways of styling in a react native component ?. The Complete React Native Developer Course 2023 [Videos].

Stying in React Native is not the same as normal CSS. For styling elements in React Native, JavaScript objects are used. Every core component in React Native accepts the style prop which accepts a JavaScript object containing CSS property names as key. Any CSS property used in these objects follows the camel case convention, for instance. backgroundColor is used rather than background-color.

Creating ReactNative App and Module Installation:

  • Step 1: Open your terminal and install expo-cli by the following command.

    npm install -g expo-cli
  • Step 2: Now create a project by the following command.

    expo init demo-app


  • Step 3: Now go into your project folder i.e. demo-app

    cd demo-app

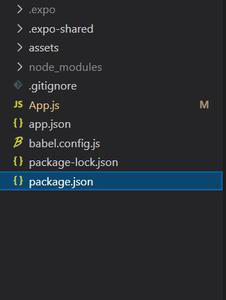
Project Structure: It will look like the following.
Approach 1: Using Inline Styles: Using inline styles is preferred only for small very small components. For large-scale production applications, it becomes cumbersome and inefficient to use inline styles.

import React from "react";
import { View, Image, Text, Button } from "react-native";
  
export default function App() {
  return (
    <View
      style={{
        height: 550,
        margin: 20,
        marginTop: 80,
        shadowColor: "#000",
        elevation: 5,
        borderRadius: 10,
      }}>
      <View
        style={{
          width: "100%",
          height: "60%",
          borderTopLeftRadius: 10,
          borderTopRightRadius: 10,
          overflow: "hidden",
        }}>
        <Image
          style={{
            width: "100%",
            height: "100%",
          }}
          source={{
            uri: 
          }}
        />
      </View>
      <View
        style={{
          alignItems: "center",
          height: "20%",
          padding: 10,
        }}>
        <Text
          style={{
            fontSize: 18,
            marginVertical: 2,
          }}>
          Styling in React Native
        </Text>
        <Text
          style={{
            fontSize: 14,
            color: "#888",
          }}>
          Using Inline Styles
        </Text>
        <Text
          style={{
            fontSize: 14,
            textAlign: "justify",
            margin: 5,
          }}>
          Using inline styles is preferred only for small
          very small components. For large-scale production
          applications, it becomes cumbersome and 
          inefficient to use inline styles.
        </Text>
      </View>
      <View
        style={{
          flexDirection: "row",
          justifyContent: "space-between",
          alignItems: "center",
          height: "20%",
          paddingHorizontal: 20,
          marginTop: 10,
        }}>
        <Button color="#006600" title="Understood!" />
        <Button color="#006600" title="What?!!" />
      </View>
    </View>
  );
}

Start the server by using the following command.

npm run android

Output: If your emulator did not open automatically then you need to do it manually. First, go to your android studio and run the emulator. Now start the server again.

Approach 2: Using StyleSheet: As a component grows in complexity, it is much cleaner and efficient to use StyleSheet.create to define several styles in one place.

import React from "react";
import { View, Image, Text, Button, StyleSheet } from "react-native";
  
export default function App() {
  return (
    <View style={styles.product}>
      <View style={styles.imageContainer}>
        <Image
          style={styles.image}
          source={{
            uri: 
          }}
        />
      </View>
      <View style={styles.details}>
        <Text style={styles.title}>Styling in React Native</Text>
        <Text style={styles.subtitle}>Using StyleSheet</Text>
        <Text style={styles.description}>
          As a component grows in complexity, it is much cleaner 
          and efficient to use StyleSheet.create so as to define 
          several styles in one place.
        </Text>
      </View>
      <View style={styles.buttons}>
        <Button color="#006600" title="Understood!" />
        <Button color="#006600" title="What?!!" />
      </View>
    </View>
  );
}
  
const styles = StyleSheet.create({
  product: {
    height: 500,
    margin: 20,
    marginTop: 80,
    shadowColor: "#000",
    shadowOpacity: 0.26,
    shadowOffset: { width: 0, height: 2 },
    shadowRadius: 8,
    elevation: 5,
    borderRadius: 10,
    backgroundColor: "#fff",
  },
  imageContainer: {
    width: "100%",
    height: "60%",
    borderTopLeftRadius: 10,
    borderTopRightRadius: 10,
    overflow: "hidden",
  },
  image: {
    width: "100%",
    height: "100%",
  },
  details: {
    alignItems: "center",
    height: "20%",
    padding: 10,
  },
  title: {
    fontSize: 18,
    marginVertical: 2,
  },
  subtitle: {
    fontSize: 14,
    color: "#888",
  },
  description: {
    fontSize: 14,
    textAlign: "justify",
    margin: 5,
  },
  buttons: {
    flexDirection: "row",
    justifyContent: "space-between",
    alignItems: "center",
    height: "20%",
    paddingHorizontal: 20,
  },
});

Start the server by using the following command.

npm run android

Output: If your emulator did not open automatically then you need to do it manually. First, go to your android studio and run the emulator. Now start the server again.

Reference: https://reactnative.dev/docs/stylesheet

See All

Comments (159 Comments)

Submit Your Comment

See All Posts

Related Posts

React Native / Youtube

Setting up the development environment of React Native.

If you are new to mobile development, the easiest way to get started is with Expo CLI. Expo is a set of tools built around React Native
8-Sep-2021 /1 /159

React Native / Blog

How React Native is different from ReactJS ?

ReactJS: It is a JavaScript library that supports both front-end and server-side. It is a popularly used library, which focuses on developing user interfaces (UI) for mobile as well as web-based applications. Developed by Facebook, it is based on the JavaScript language and hence, it is synonymously also called ReactJS.
19-jan-2022 /1 /159

React Native / Blog

How to Use Routing with React Navigation in React Native ?

Almost every mobile application requires navigating between different screens. React Native provides an elegant and easy-to-use library to add navigation to native applications: react-navigation. It is one of the most popular libraries used for routing and navigating in a React Native application.
19-jan-2022 /1 /159